Sunday, March 17, 2019

Happy Saint Patrick's Day!

 Happy Saint Patrick's Day 
 everyone! 

Here are a few images from books in my Saint Patrick's Day collection to get you in the mood.

This is a page from the "Children's Party Book" published in 1935 for a Saint Patrick's Day party.

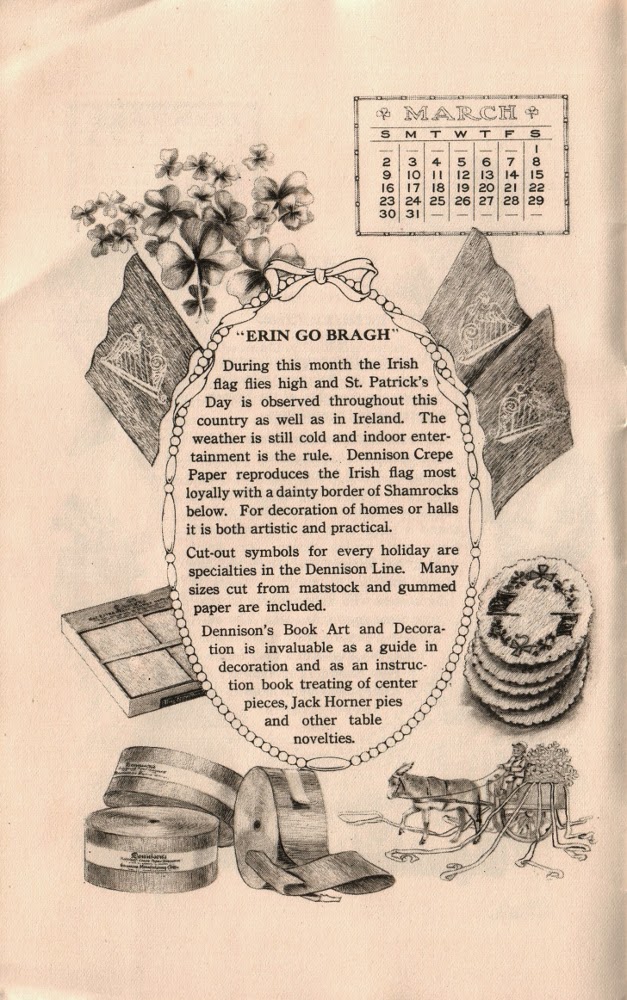
Dennison produced booklets to promote their products. This page for Saint Patrick's Day appears in the promotional booklet "Dennison Crepe Paper Almanac 1913". The booklet doesn't give instructions on how to make the decorations, it is strictly for promotional purposes.

And finally, here is a recipe for "Soda Bread" that I got from a woman in Ireland when I was there many years ago. Bake up a batch, have a cup of tea, and enjoy yourself.

 "Irish Soda Bread

4 cups wholewheat flour
2 cups white flour (I use 6 cups of wholewheat flour)
1 1/2 teaspoons baking soda (Break up the soda in your hand to get rid of any lumps.)
1 teaspoon salt
Mix the dry ingredient with a balloon whisk in a large bowl.
Add enough buttermilk or sour milk (I use buttermilk but I've also used yogurt, apple juice or any tart fruit juice) so that the mixture is not too dry or too wet. Don't knead the dough just form it into a ball. You can either make one large loaf or cut it in half and make two smaller loaves. Form them into balls and coat with flour. Place on a baking sheet and press the dough into a flat disk about 2 1/2" thick. Cut the surface with three or four intersecting cuts. Bake in a 350 degree oven for 1 hour or until the loaf sounds hollow when rapped with your knuckle on the bottom of the loaf.

That's all there is to it! It takes about 1 1/4 hours to mix and bake some of the best quick bread that you have ever tasted.

Monday, December 31, 2018

I may be late for Christmas but I'm on time for New Year's Eve.

 
   A LATE MERRY CHRISTMAS EVERYONE!  

Christmas has come and gone. I do hope everyone had a great time shopping, tidying the house, wrapping gifts and opening them Christmas Eve or Christmas morning, visiting with friends and relatives, eating, eating, and more eating, and then finally relaxing the days after. I love Christmas, it can be a lot of work, but I love the season.

The contrite me has decided to send a serious and contemplative greeting.

  "HAPPY NEW YEAR!"  


The problem is LIFE HAPPENS and there's not much you can do about it but pull up your socks, stop moping about, and have fun! So, from my favourite family to yours...

Thursday, November 22, 2018

Sunday, October 7, 2018

Sunday, September 23, 2018

The making of "On the way to the Jollity Fair..." - part 2

Hello! Part 2 is all about the bottom section of "On the way to the Jollity Fair..."

I have been collecting pictures of fairgrounds and midway rides for quite a few years.


Edward Ardizzone is one of my favourite artists. This was probably the first image that I put into the folder for the Jollity Fair. There will be part of the midway featured in the lower section of the sculpture.


Most of the pictures of fairs in my folder are of British origin. I was wanting low key, rural.


This picture is after the bottom section changed direction. The opening with the domed background is 2 1/4" high and 3" wide, definitely not big enough for any fairground ride. The scale for a ferris wheel would have been very small indeed.


The ground on both the upper and lower levels is painted, the hills in the back are looking good, bushes have been added in the lower level.


Here is a closer look at the sky and the brown moulding. The sky has soft hazy clouds streaked through the blue, I liked it but it just didn't work at all. The bottom section dominated the sculpture creating two separate vignettes not at all working as a cohesive unit. The blue sky became history, another paint layer towards a more interesting final surface.

During the process of adding the composition to the top section I made certain to leave small remnants of composition on the exposed moulding. I don't want it to look polished and pristine. The moulding had to look like it was just emerging from the soil or possibly being consumed by it.


I had decided to show stalls with produce and souvenirs. Those two poles were to have a banner suspended between them, it was to be the entrance to the Jollity Fair.


This is the banner. Jollity Village presents the annual Jollity Fair. Originally, I'm talking 10 years ago, Jollity Fair was spelt J-O-Llity Fair. I wanted it to be J-O-L as in Jack-O-Lantern but once on the banner the pronunciation was confusing so that was scrapped. The banner was printed twice, the second slightly larger and then after placing it between the poles I realized this looked terrible as well. The banner idea was scrapped. The poles were to be turned into tree trunks; branches, leaves and limbs had to be made.


A month or so before having to create the two small trees on either side of the opening I came across this flower punch at Salvation Army, I hesitated buying it but decided to anyway. This punch turned out to be perfect for the leaves for the trees. It is amazing but this happens to me regularly. The Holy Spirit puts items that I need but I haven't seen for years and items that I will need but don't realize it yet right where I will see them when I am at the thrift stores. Thank-you, Holy Spirit!


The dark brown soil, moulding, and the blue sky has been painted with various browns and greens, it looks better already. The halo of blue around the opening will be gently brushed and faded into the green background behind the trees once they are finally built. The stack of black cardboard disks by the unfinished tree is the base the ticket booth/puppet theatre will be glued to.


This October 1954 cover for the Christian Herald was one of my inspiration photos.


Slowly but surely the bottom section was changing from a midway to a rural farming fair, these vendor's stalls were the inspiration for the stalls in my sculpture. My fair is much more colour and style coordinated than any normal fair. The artist/designer in me would love to see fairs done this way.


Earlier in this blog post you will remember me mentioning how small any midway rides would have had to be, well that goes for produce stalls and the produce that is displayed on them. What on earth was I going to use for the vegetables, I had nothing. I finally settled on using vintage floral stamens. Each stamen was individually hand painted. The detail in this sculpture is way more than anything that I have created before, I have had an absolute blast.


I didn't want the vegetables to look "real" just an impression, the viewer can decide what they are. They kind of look like squash and peppers or pears, apples, pumpkin and something else.


The tiny baskets are made from a small metal ring glued to a 1/4" paper punch disk of thin card, that's how small these suckers are!


It's interesting that after all of the images that I have collected and the various changes that I have made to the sculpture this one picture that I took at Metchosin Days a few years ago summed up what the sculpture was about. I was recreating the Metchosin Days country market/fair but with input from other design sources.


Two of the finished stalls piled high with the tiny produce.


I love this illustration from an English children's annual. There had to be balloons in the tiny scene.


Here are the balloons, a tiny chair to tie some of them to, and a stall filled with balls and souvenir horns.

The balloons are the plastic tips to sewing pins, the tops to glass head pins are impossible to take off, they would also be to heavy. The plastic head was glued to a section of fine brass wire. I repainted each balloon it's original plastic tip colour and painted a clear gloss varnish on top. A soft grey was added to the string to complete these tiny props.

The chair is a tiny silver oriental charm bracelet charm. The seat is a small disc of card glued in place to hide the open base. A white base coat is under the thin green top coat, the seat is a very deep green.

Souvenir horns are the tips of round toothpicks painted, cut off, and the exposed wood painted. Of all of the props that were made these horns were the easiest and quickest to make unless you consider the balls, they are vintage map pins with no painting required. Some of the pins had cream coloured dots on top, a design bonus.


I happened across the sentry post and immediately wanted a ticket booth/puppet theatre that looked similar to this.


I am so proud of this little structure, it was a pain to make. The roof was originally from a lampshade finial that has been around for quite a few years. The structure was made over a tapered wooden finial. I won't go into the details of finding the position of the stripes and matching the top of the stripe to a different spacing width at the bottom, drawing a curved opening, cutting it out, and then drawing and cutting a curved shelf to be glued in place. Many attempts were made with each small detail and then discarded is all that I will say.


The bottom section of the sculpture is finished, what a journey this has been. The trees are finished. Some branches were added into the background, they aren't even attached to the trees, they give the appearance of lush full trees. Bushes and undergrowth fill out the bases of the trees. The sky has been softly faded into the mottled green background behind the trees. The vendor's stalls are in place. I am very pleased with how this bottom section turned out, I'm pleased with the entire sculpture.

Metchosin Days country fair is the inspiration for the Jollity Fair, check out this link that I posted in 2009.


The finished sculpture, "On the way to the Jollity Fair...", is available to purchase here.